
You need to ensure that there is adequate ventilation for the new rooms and/or roofs when you construct a loft conversion. On this page, you will find guidelines for the specified materials and construction to achieve this.
Ventilation of rooms
Habitable rooms must meet all of the following requirements:
- A window with an opening equivalent to 5% (1/20th) of the floor area
- Background ventilation (also called trickle vents or night vents) of 8000mm², which can be closed to prevent draughts
Bathrooms or shower rooms (with or without a WC) must meet requirements 1 and 2, or 1 and 3 below:
- a mechanical extractor fan with a minimum of 15 litres per second capacity
- a 15 minute overrun of the extractor fan after the room is vacated, controlled by the light switch or a humidistat
- background ventilation of 4000mm², and an opening window (no minimum size)
Sanitary accomodation (a WC) must meet requirement 1 or 2 below.
- a window with an opening equivalent to 5% (1/20th) of the floor area, and background ventilation of 4000mm²
- a mechanical extractor fan with a minimum 6 litres per second capacity, with a 15 minute overrun after the room is vacated, controlled by the light switch or a humidistat
Ventilation of roofs
The introduction of a habitable room into a previously open roof space will restrict the flow of natural ventilation through the roof, and could cause condensation in the space between the insulation material and the roof covering. You will need to increase any existing ventilation provision at the eaves, to provide a path for the air to flow over the insulation, and out through the top of the roof slope.
The ventilation must meet the all of following guidelines.
Eaves ventilation
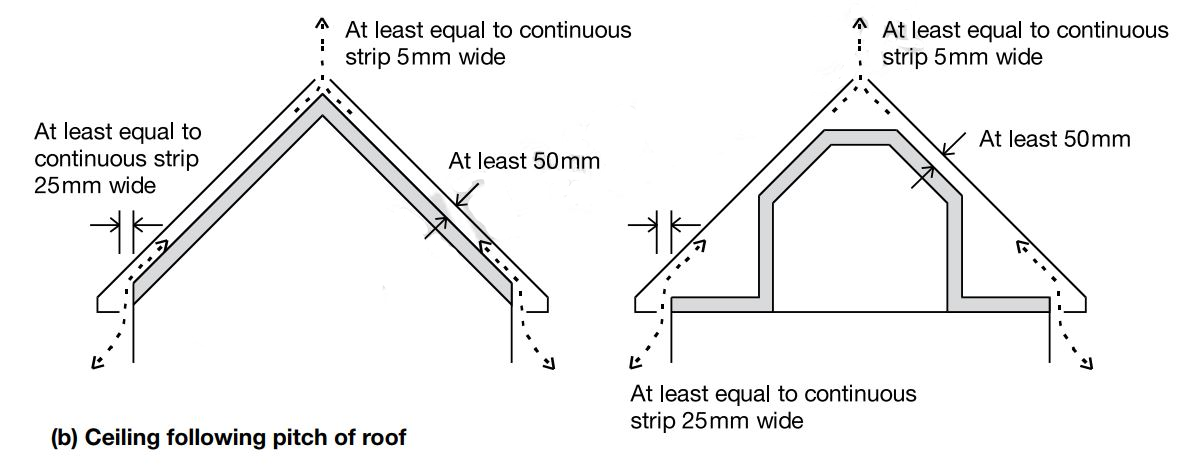
- A continuous 25mm-wide opening, or the equivalent area is required along the length of the eaves
Cross ventilation
-
There should be a clear 50mm of air space between the insulation and the roofing felt.
-
You may need to add battens to the underside of the roof joists, to allow for this clear space
-
If roof trimmers or hips restrict the passage of air from the eaves to the ridge, you can drill a series of 25mm holes into these members to allow a continuous airflow. Be careful to ensure that the location and size of these holes will not impair the strength of these members.
Ventilation at the ridge or high level
-
A continuous 5mm-wide opening, or the equivalent area, is required along the length of the ridge.
-
Where the ceiling (or the insulation) continues up to the ridge (as in the first diagram below), you will need to provide ventilation at the ridge. The ridge tiles can be replaced or altered with a vented dry-ridge.
-
If there is a flat ceiling at some distance from the underside of the ridge (as in the second diagram below), then the void created over this ceiling can be vented. The simplest way to achieve this is by using vent-tiles. The spacing of vent-tiles varies with each type, and you should be careful to follow the manufacturer's recommendations. The vent-tiles must ventilate the void area, and not lower down the roof slope.
Vapour control layer
Vapour control layers can reduce the amount of moisture reaching the void and the insulation (but not eliminate it completely, hence the need for ventilation). The walls and sloping ceiling should be lined one of the following:
- a 500 gauge (150 micron) polythene sheet fixed between the lining and the insulation
- a foil-backed plasterboard
Breather membranes
As an alternative to roof ventilation, you can replace the tile underlay with a breathable roofing membrane. You should be careful to follow the manufacturer's instructions for this type of installation.